Stage Editor GPA
Learn the drag-and-drop editor - GPA par settings.
The Editor - GPA Settings
GPA, Galactic Pistol Alliance, uses a par time to classify shooters. The math behind the par system is outside the scope of this tutorial. For more information on par calculations, see the Galactic Pistol Alliance website.
This tutorial covers how to use the GPA settings in the editor.
Basics
While you build your stage in the editor, some of the required information is being gathered in the background for you. Items like shot count, number of targets, and number of steel are all automatically tabulated.
Shooting Positions Mode
At the top of the GPA tab is the Shooting Positions Mode toggle. Enabling this activates a planning overlay on top of the stage canvas where you can place shooting positions and mark target engagements.
- Shift+Click on the canvas to place a shooting position (blue circle).
- Ctrl+Click to place a waypoint (gray circle) for movement path planning.
- Right-click a position or waypoint to delete it.
- Click on the red line between shooting positions to set a precise distance instead of the auto-calculated value.
When Shooting Positions Mode is active, interaction with the canvas underneath is blocked so you can work on the overlay without accidentally moving stage elements.
Below the toggle there are additional overlay controls:
- Auto Calculate Distances - When enabled (default), movement distances between positions are calculated automatically.
- Show Target Markers - Displays yellow markers (or orange for headshots) showing which targets each position engages.
- Show Movement Times - Displays estimated movement time between positions.
- Clear - Removes all shooting positions and markers from the overlay.
Marking Target Engagements
With Shooting Positions Mode and Show Target Markers enabled, you can mark which targets each shooting position engages:
- Place your shooting positions on the canvas using Shift+Click.
- Shift+Click a shooting position to select it as a marker start point.
- Click on a target to place an engagement marker. The system automatically detects headshot hardcover targets and steel, and displays a different color for each. Shift+Click on a target in marking mode to immediately begin another shot marker. Press Esc to cancel the current marker.
- Once your shot markers are placed, they stay attached to their targets when the targets are moved. Right-click a shot marker circle to delete it.
- Click on a dashed shot marker line to set a precise distance instead of the auto-calculated value.
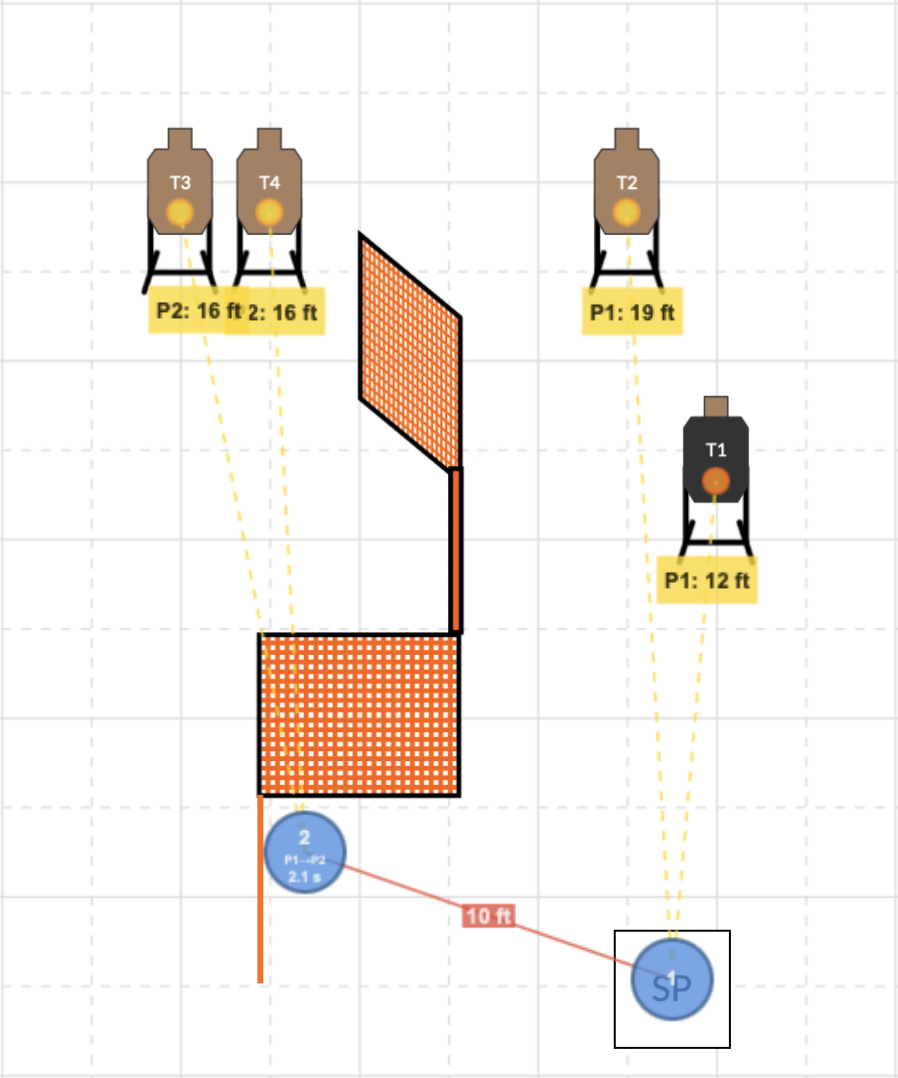
As you mark engagements, the Total Shots, Headshots, and Steel fields in the par calculation update automatically.
Par Calculation Fields
The GPA tab includes a series of fields that feed into the par time formula. Some are auto-populated from the canvas and shooting positions, while others require manual entry.
Auto-Populated Fields
These fields update automatically as you place targets on the canvas and mark engagements from shooting positions:
- Total Shots - The total round count for the stage. This stays in sync with the round count on the General tab. When you mark target engagements from shooting positions, this updates automatically.
- Headshots - The number of shots directed at headshot zones. Auto-counted when you place target markers on headshot areas.
- Knockdown - The number of knockdown plate/popper engagements. Auto-counted from steel target markers. Stays in sync with the steel count on the General tab.
- Movement Time - The total movement time in seconds across all shooting position transitions. Auto-calculated from overlay distances using the GPA movement formula.
You can still manually override these fields if needed, but they will update again if you modify shooting positions or target markers.
Manual Entry Fields
These fields are always entered by hand:
- Shooter Draw - A toggle. Check this if the stage begins with a draw from the holster.
- Reloads - The number of magazine changes required during the stage.
- SHO/WHO - The number of shots fired strong hand only or weak hand only.
- On The Move - The number of shots taken while the shooter is moving.
- Steel <8" - The number of small steel plate engagements (under 8 inches). Texas Star plates count here too (5 plates per star).
- >25 Yards - The number of shots at targets beyond 25 yards.
- Moving Target - The number of shots at moving targets.
- Low/No Light - The number of shots taken in low-light or no-light conditions.
Complexity Factors
The Complexity Factors section expands to show individual stage complexity items, each with its own time value. Enter a count for each factor that applies. Examples include Unloaded Start, Car Start, Go Prone, Open Door, Carry Prop, and more. Different factors contribute different amounts to the par time (e.g., Go Prone adds 3 seconds per occurrence, while Open Window adds 0.3 seconds).
The Calculated Par field at the top of the GPA tab is read-only and updates in real time as you change any of the fields above. The formula multiplies each field value by a fixed coefficient. For details on the coefficients, see the Galactic Pistol Alliance website.
Movement Distance and Time
When Auto Calculate Distances is enabled, the overlay calculates the distance between each consecutive shooting position. Distances are shown in feet. Estimated movement times are displayed between positions when Show Movement Times is enabled.
These distance values are calculated based on the canvas scale (the yard dimensions you set in the Settings tab), so make sure your canvas scale is accurate for meaningful distance estimates.
Saving GPA Settings
All GPA par fields, shooting positions, and target markers are saved along with the stage when you hit Save. The calculated par time is stored separately for quick reference in the stage library. GPA settings are also preserved in version snapshots, so restoring a previous version brings back the GPA configuration from that point in time.